How to Enable TPM in MSI BIOS for Windows 11
Updated Published
On this page
MSI boards name TPM a little differently than ASUS and Gigabyte, so it’s easy to miss the setting and fail Windows 11’s TPM 2.0 check. This guide focuses only on MSI motherboards (MAG, MPG, MEG, PRO series) and shows exactly where to enable fTPM without touching your memory or CPU tuning.
Overview – where MSI hides TPM
On modern MSI gaming boards the TPM option usually lives under:
- Settings → Security → Trusted Computing, or
- Settings → Advanced → Windows OS Configuration
The key names you’re looking for:
- Security Device Support
- AMD fTPM (for Ryzen CPUs)
- Intel PTT / Firmware TPM (for Intel CPUs)
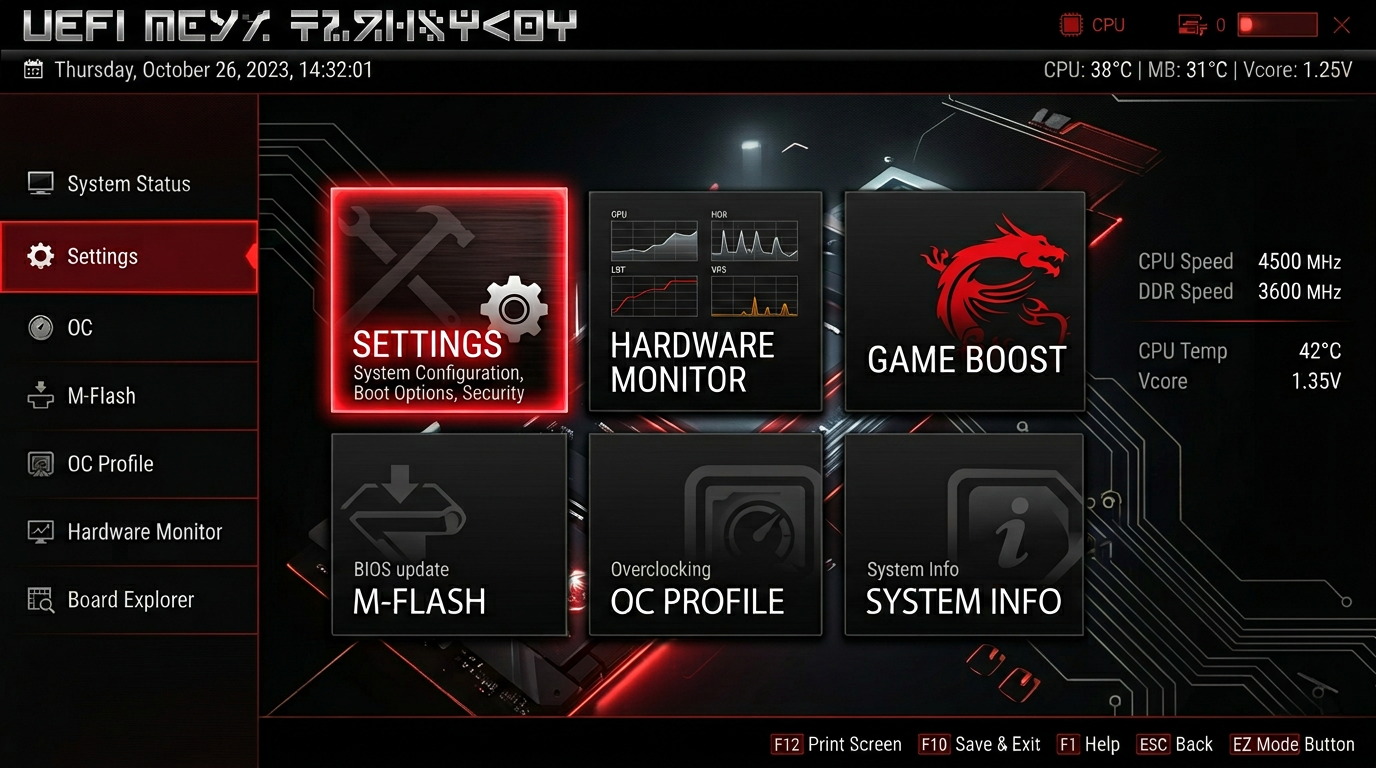
Step 1 – Access MSI Click BIOS
- Shut down your PC completely.
- Power on and repeatedly press
Deluntil you see the MSI Click BIOS screen. - If you land in an EZ view, press F7 to enter Advanced view so all settings are visible.
On most modern MSI boards (B450/B550/X570, B660/B760/Z690/Z790, etc.) this interface looks identical across models.
Click BIOS 5 vs Click BIOS X
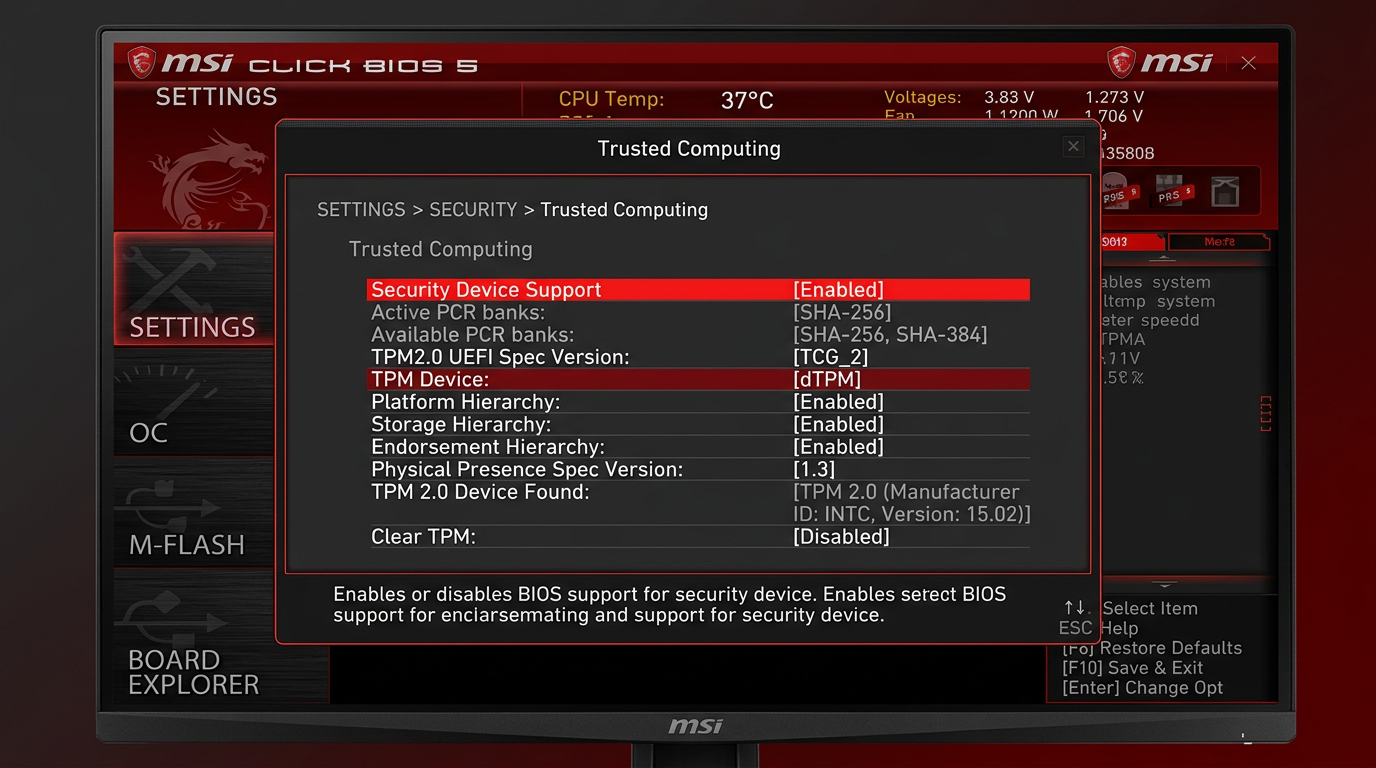
- Click BIOS 5 is the red-and-black interface used on most MSI boards from roughly 2015 through the 600/700-series era. The TPM path is Settings → Security → Trusted Computing → Security Device Support → Enable.
- Click BIOS X is the redesigned interface on the newest boards (Z790 refresh, 800-series and later). The layout looks different, but TPM still lives in a Trusted Computing page under the Security/Settings area — search for Security Device Support if you can’t spot it, and set it to Enabled the same way.
Everything below applies to both; only the visual skin changes.
Step 2 – Enable TPM on Intel MSI motherboards
If you’re running an Intel CPU (e.g. i5‑12400F, i7‑13700K):
- In BIOS, go to the Settings tab on the left.
- Open Security.
- Enter Trusted Computing.
- Turn Security Device Support to Enabled.
- If there is a TPM Device Selection option:
- Choose Firmware TPM (or PTT) instead of Discrete TPM.
You should now see TPM 2.0 information populated in the same screen after a brief pause.
Alternative Intel layout – Windows OS Configuration
Some newer Intel MSI boards move PTT here:
- Go to Settings → Advanced → Windows OS Configuration.
- Set Windows 11 WHQL Support to Enabled or UEFI.
- This may automatically enable Secure Boot and PTT / Firmware TPM in the background.
If you prefer manual control, still verify Trusted Computing afterward to confirm TPM is actually on.
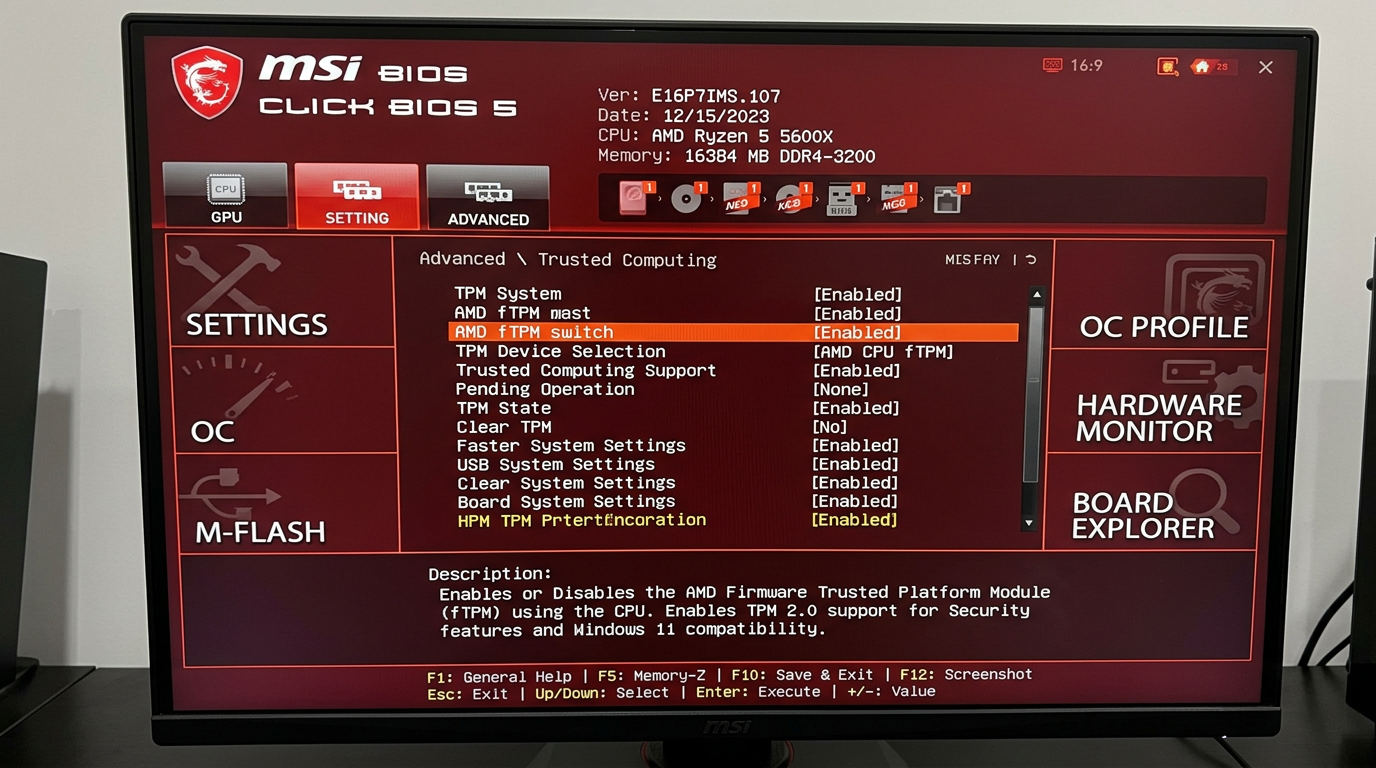
Step 3 – Enable fTPM on AMD MSI motherboards
For Ryzen‑based MSI boards (B450/B550/X570/B650/X670, etc.):
- Go to Settings → Security.
- Open Trusted Computing.
- Set Security Device Support to Enabled.
- Look for:
- AMD fTPM switch
- or TPM Device Selection
- Set this to AMD CPU fTPM or Firmware TPM.
Avoid using dTPM unless you physically installed an MSI TPM module.
TPM Device Selection – dTPM vs fTPM/PTT explained
MSI’s TPM Device Selection option offers two choices:
- fTPM / PTT (firmware TPM) — the TPM built into your CPU. AMD fTPM on Ryzen, Intel PTT on Intel. This is what almost every MSI owner should select; it fully satisfies Windows 11’s TPM 2.0 requirement with zero extra hardware.
- dTPM (discrete TPM) — a physical TPM 2.0 module plugged into the board’s TPM header (MSI sells the “TPM 2.0 Module” separately). If you select dTPM without a module installed, Windows will see no TPM at all — this is the single most common mistake when the setting “doesn’t work”.
MSI B550 / B450 note
The popular MSI B550 (Tomahawk, Gaming Plus, MAG, PRO-VDH) and B450 boards all expose fTPM in the same place: Settings → Security → Trusted Computing. Set Security Device Support to Enabled and choose AMD CPU fTPM. On very old B450 BIOS versions the Trusted Computing page may be missing — update to a Windows 11-ready BIOS from MSI’s support page first, then the option appears.
Step 4 – Check UEFI and Secure Boot on MSI
Windows 11 expects your MSI system to boot in UEFI mode with Secure Boot available.
- Stay in BIOS and go to Settings → Advanced → Windows OS Configuration.
- Make sure:
- Boot Mode Select is UEFI (not Legacy).
- Secure Boot is Enabled or set to Standard.
- If you enable Windows 11 WHQL Support, MSI sometimes auto‑configures these for you. That’s fine as long as Windows still boots after saving.
If your drives are still MBR, turning off Legacy/CSM may cause boot issues. In that case:
- Keep TPM enabled.
- Re‑enable any Legacy option required for boot.
- Convert your system drive to GPT later using Microsoft’s
mbr2gpttool before fully committing to UEFI‑only mode.
Step 5 – Save changes without wiping TPM
- Press F10.
- In the confirmation popup, verify that Security Device Support = Enabled (and fTPM/PTT is on).
- Confirm and reboot into Windows.
Do not use any Clear TPM / Clear fTPM buttons unless you understand BitLocker and recovery keys. Clearing TPM can make encrypted drives unusable without the key.
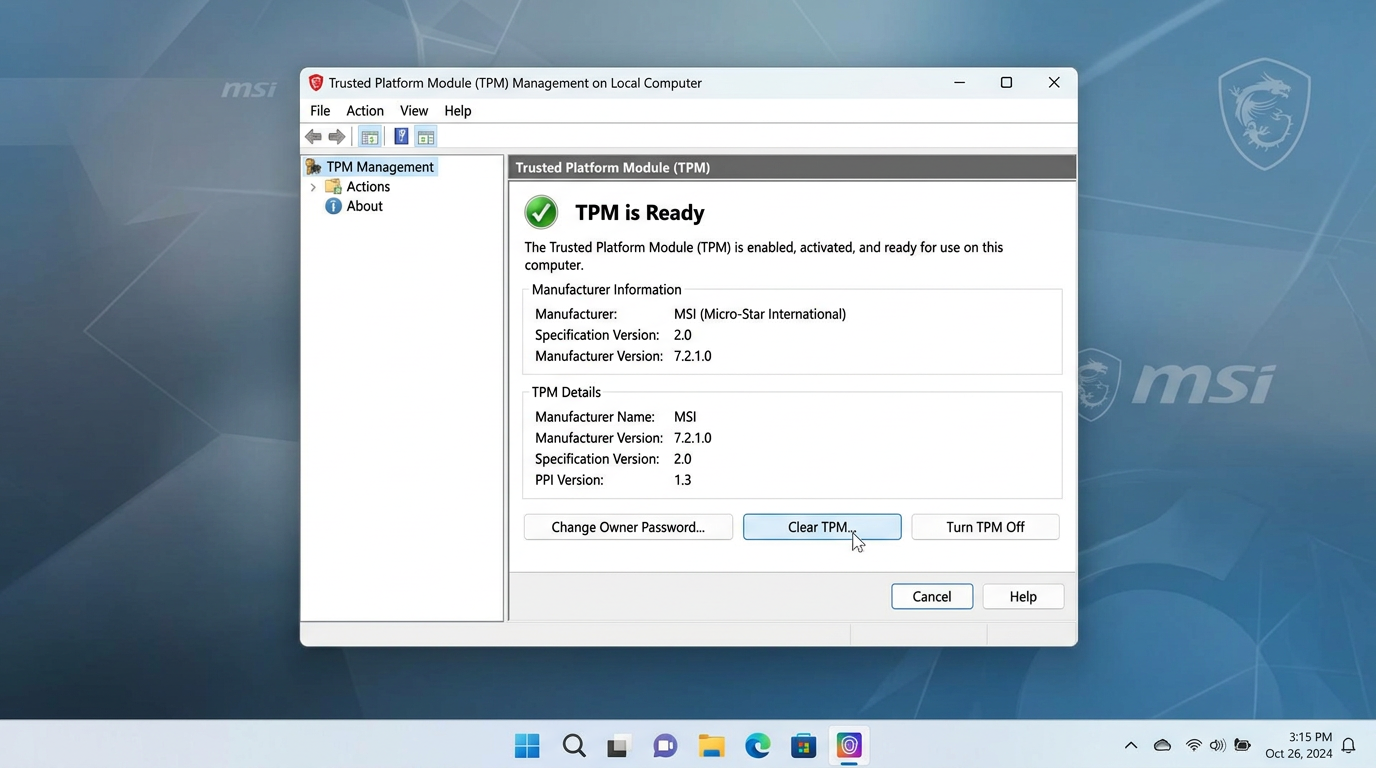
Step 6 – Confirm MSI TPM status in Windows
Back in Windows 10/11:
- Press
Win + R, typetpm.msc, press Enter. - In TPM Management, look for:
- Status: “The TPM is ready for use”
- Specification Version: 2.0
If you see “Compatible TPM cannot be found”:
- Double‑check that you saved BIOS changes (F10), not just exited.
- Confirm Security Device Support is still Enabled in MSI BIOS.
- Update to the latest BIOS for your exact MSI model from the official support page.
MSI series‑specific tips
MAG / MPG gaming boards
- Usually expose Trusted Computing by default under Settings → Security.
- Many recent models add a Windows 11 WHQL toggle – turning it on will enable most required security features, but you should still verify TPM in
tpm.msc.
MEG enthusiast boards
- Often include advanced security menus and workstation features.
- If you dual‑boot or run RAID, verify boot order and storage modes after enabling Secure Boot so nothing breaks.
MSI PRO / business models
- Some ship with conservative defaults for older OS support.
- You may need to:
- Enable UEFI boot first,
- Then turn on Security Device Support and fTPM.
How to disable TPM in the MSI BIOS
Need to turn it off again (fTPM stutter troubleshooting on older AGESA, or board swap prep)?
- Suspend or disable BitLocker in Windows first — otherwise the next boot demands a recovery key.
- Enter BIOS with
Del, go to Settings → Security → Trusted Computing. - Set Security Device Support to Disabled.
- Save with F10.
Windows 11 and anti-cheats like Vanguard expect TPM, so re-enable it when you’re done troubleshooting.
Verify TPM 2.0 in Windows
Win + R→tpm.msc→ Specification Version 2.0, “The TPM is ready for use”.- Or Settings → Privacy & security → Windows Security → Device security → Security processor.
Does TPM on MSI hurt FPS or input lag?
No. On MSI systems with firmware TPM:
- The TPM logic is handled by your CPU in the background.
- It only wakes up for security operations (BitLocker keys, Secure Boot checks, etc.).
- It does not meaningfully affect frame rates or mouse input in esports titles.
If you want to push your MSI build further for competitive games, pair this with:
- How to Enable Secure Boot in MSI BIOS for Windows 11 — required alongside TPM by many anti-cheats
- How to minimize input delay for competitive gaming
- The ultimate guide to timer resolution for gaming + Tier1Timer
Other motherboard brands
Different board? Use the matching guide:
- How to Enable TPM in ASUS BIOS for Windows 11
- How to Enable TPM in Gigabyte BIOS for Windows 11
- How to Enable TPM in ASRock BIOS for Windows 11
Quick reference – MSI TPM settings for Windows 11
For MSI motherboards, the typical path is:
- Settings → Security → Trusted Computing
- Security Device Support = Enabled
- AMD fTPM / Intel PTT / Firmware TPM = Enabled
- Settings → Advanced → Windows OS Configuration
- Boot Mode Select = UEFI
- Secure Boot = Enabled
Get those right, confirm TPM 2.0 ready for use in Windows, and your MSI gaming PC will pass the Windows 11 checker cleanly.
Frequently asked questions
Where is Trusted Computing in MSI Click BIOS 5?
In Click BIOS 5 press F7 for Advanced mode, then go to Settings → Security → Trusted Computing and set Security Device Support to Enabled. Pick AMD fTPM or Intel PTT under TPM Device Selection if shown.
What is MSI dTPM and should I use it?
dTPM means a discrete TPM module plugged into the board's TPM header. Only select dTPM if you installed one. For everyone else, fTPM (AMD) or PTT (Intel) — the firmware TPM in your CPU — is the correct choice for Windows 11.
How do I enable TPM 2.0 on an MSI B550 or B450 board?
Press Del at boot, F7 for Advanced mode, then Settings → Security → Trusted Computing. Set Security Device Support to Enabled and TPM Device Selection (or AMD fTPM switch) to AMD CPU fTPM. Save with F10.
What MSI BIOS settings does Windows 11 need?
Three things: Security Device Support Enabled with fTPM/PTT (Settings → Security → Trusted Computing), Boot Mode set to UEFI, and Secure Boot Enabled (Settings → Advanced → Windows OS Configuration).
How do I disable TPM in the MSI BIOS?
Return to Settings → Security → Trusted Computing and set Security Device Support to Disabled. Suspend BitLocker in Windows first, or you'll be asked for a recovery key on the next boot.